How to Install Portainer on Proxmox (Ubuntu VM)

If you’re running containers inside a Proxmox virtual machine, installing Portainer is one of the best ways to simplify Docker management. In this detailed tutorial, you’ll learn how to install Portainer on Ubuntu inside Proxmox, configure Docker correctly, and access the Portainer web UI securely.
This guide is optimized for performance, security, and SEO best practices.
What Is Portainer?
Portainer is a lightweight container management platform that provides a graphical interface to manage:
- Docker containers
- Images
- Volumes
- Networks
- Docker Swarm
- Kubernetes
Instead of managing containers purely via CLI, Portainer gives you a modern web dashboard.
What Is Proxmox?
Proxmox VE (Virtual Environment) is a powerful open-source virtualization platform used to run:
- KVM Virtual Machines
- LXC Containers
- Software-defined storage
We will install Portainer inside an Ubuntu VM hosted on Proxmox.
Prerequisites
Before installing Portainer on Proxmox, ensure you have:
- Proxmox VE installed and running
- Ubuntu ISO (22.04 LTS recommended)
- Minimum 2 GB RAM for VM
- Root or sudo access
- Open ports:
9000or9443
Step 1: Create Ubuntu VM in Proxmox
1. Login to Proxmox Web UI
Access:
https://YOUR_SERVER_IP:80062. Create New Virtual Machine
- Click Create VM
- Select Node
- Upload Ubuntu ISO (if not already uploaded)
- Configure:
- CPU: 2 cores
- RAM: 2048 MB
- Disk: 20 GB (recommended)
- Network: Bridge (vmbr0)
3. Install Ubuntu
Boot the VM and install Ubuntu normally.
After installation:
sudo apt update && sudo apt upgrade -yStep 2: Install Docker on Ubuntu
Portainer requires Docker. Install Docker using official repository:
Install Required Packages
sudo apt install apt-transport-https ca-certificates curl software-properties-common -yAdd Docker GPG Key
curl -fsSL https://download.docker.com/linux/ubuntu/gpg | sudo apt-key add -Add Docker Repository
sudo add-apt-repository \
   "deb [arch=amd64] https://download.docker.com/linux/ubuntu \
   $(lsb_release -cs) \
stable"Install Docker Engine
sudo apt update
sudo apt install docker-ce -yVerify Installation
docker --versionEnable Docker:
sudo systemctl enable docker
sudo systemctl start dockerStep 3: Install Portainer on Ubuntu
Now install Portainer container.
Create Volume
docker volume create portainer_dataRun Portainer Container
docker run -d \
  -p 9000:9000 \
  -p 9443:9443 \
  --name portainer \
  --restart=always \
  -v /var/run/docker.sock:/var/run/docker.sock \
  -v portainer_data:/data \
portainer/portainer-ce:latestPortainer is now installed.
Step 4: Access Portainer Web Interface
Open browser:
http://YOUR_VM_IP:9000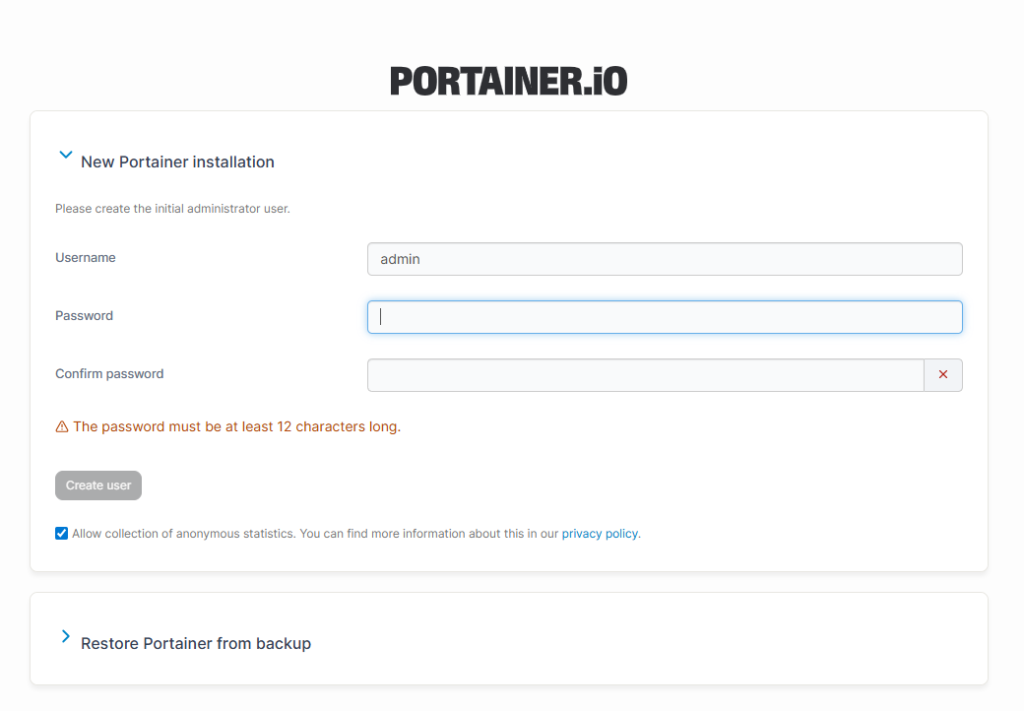
Or secure version:
https://YOUR_VM_IP:9443Initial Setup
- Create admin password
- Select Docker Environment
- Click Connect
You now have a full container management dashboard.
Step 5: Enable Firewall Rules (Optional but Recommended)
If using UFW:
sudo ufw allow 9000
sudo ufw allow 9443
sudo ufw enableStep 6: Secure Portainer with SSL (Recommended for Production)
Instead of exposing 9000, use HTTPS (9443).
You can:
- Use self-signed certificate
- Or configure NGINX reverse proxy with Let’s Encrypt
Example using reverse proxy:
sudo apt install nginx -yThen configure SSL with Certbot.
Step 7: Verify Portainer Container
Check running containers:
docker psYou should see:
portainerCheck logs:
docker logs portainerTroubleshooting
Port 9000 Not Accessible?
Check:
sudo systemctl status dockerVerify firewall:
sudo ufw statusCheck VM IP:
ip aWhy Install Portainer on Proxmox?
Running Portainer inside a Proxmox VM gives:
- Clean separation of services
- Easy backups via Proxmox snapshots
- Isolated Docker environment
- Better resource control
Final Thoughts
Installing Portainer on Ubuntu inside Proxmox is straightforward and powerful. With Docker properly configured, you gain a professional-grade container management interface within minutes.